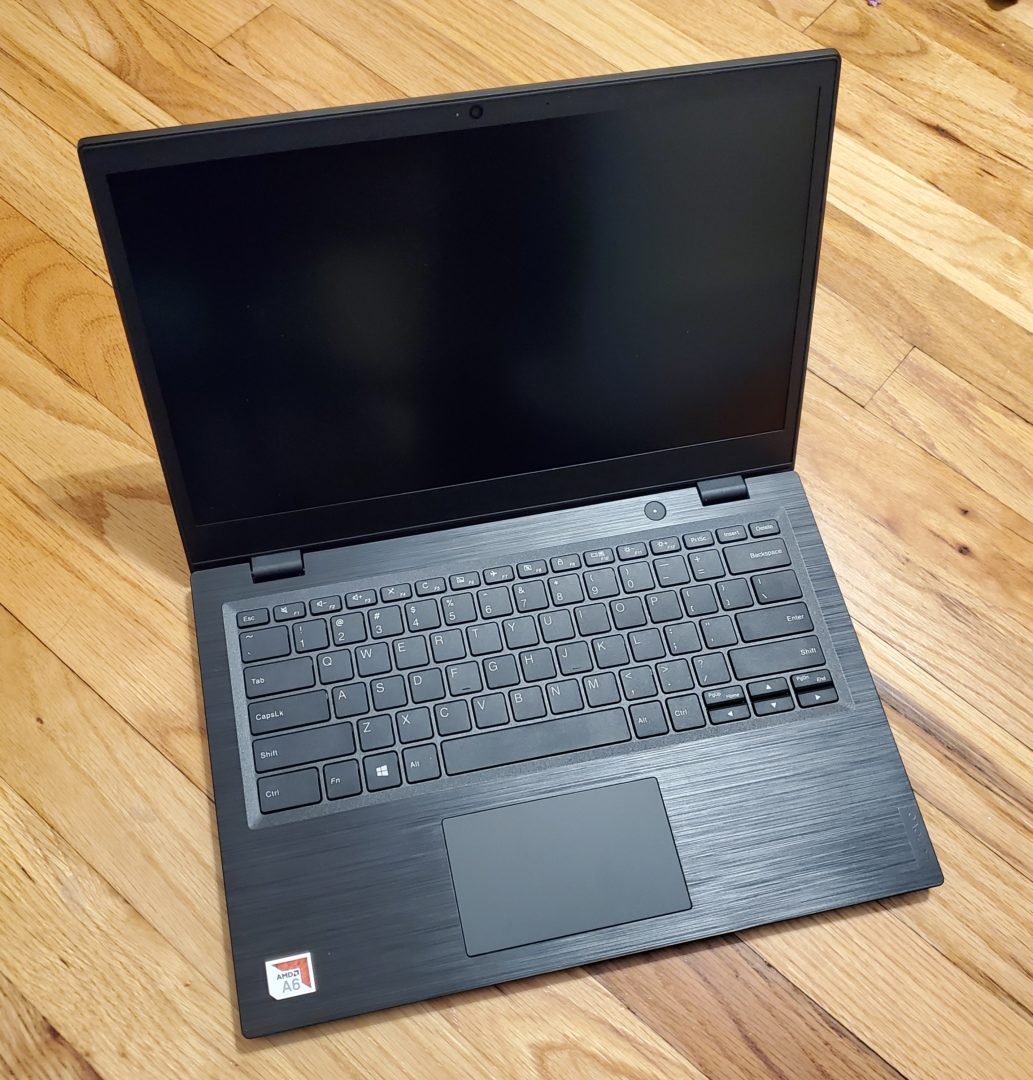
I recently bought a cheap Lenovo 14w 81MQ laptop and was curious if it would be possible to upgrade the memory or SSD. The specific version of the 14w I have is the AMD A6-9220C CPU with 64GB eMMC version and my question was whether or not there was an m.2 slot available as depicted in the general maintenance manual here, as some folks online mentioned it doesn’t exist for this specific version of the 14w:

I decided to have a look for myself and see what can be upgraded so I took it apart using the above linked maintenance manual. Note that you need to remove the bottom cover, battery, and heatsink to see that area
Disassembly Guide
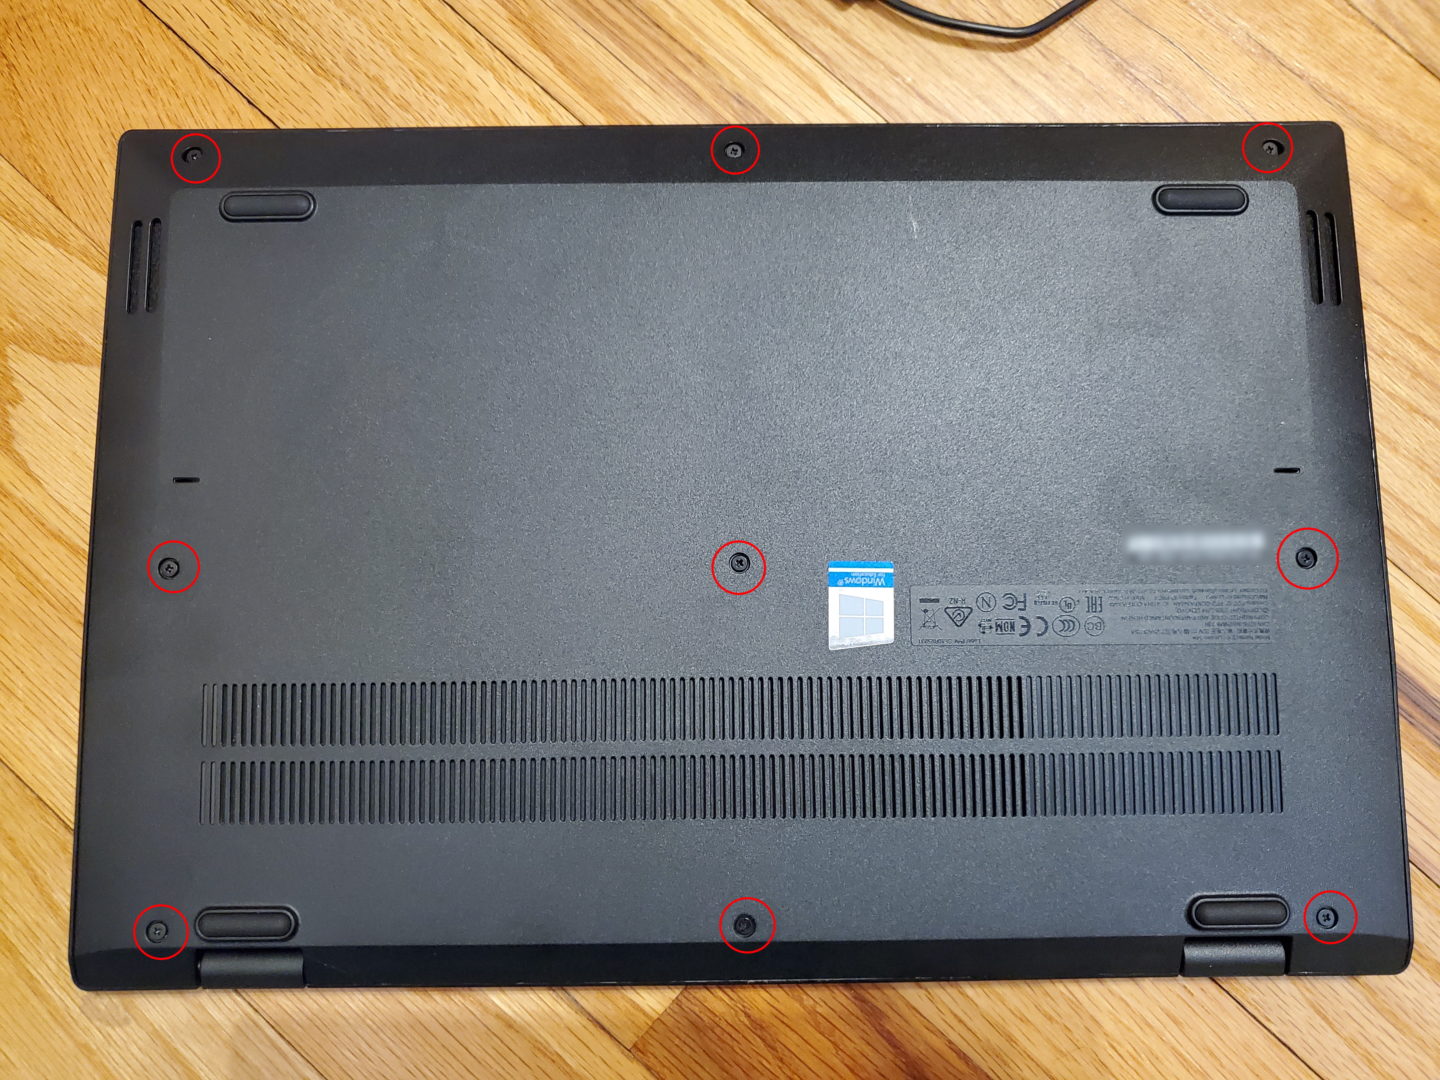
Remove the bottom cover
First, I loosened the 9 screws that hold on the bottom back plate. Note that I said loosen vs remove because the screws actually stay on the back plate, they’re not removable:
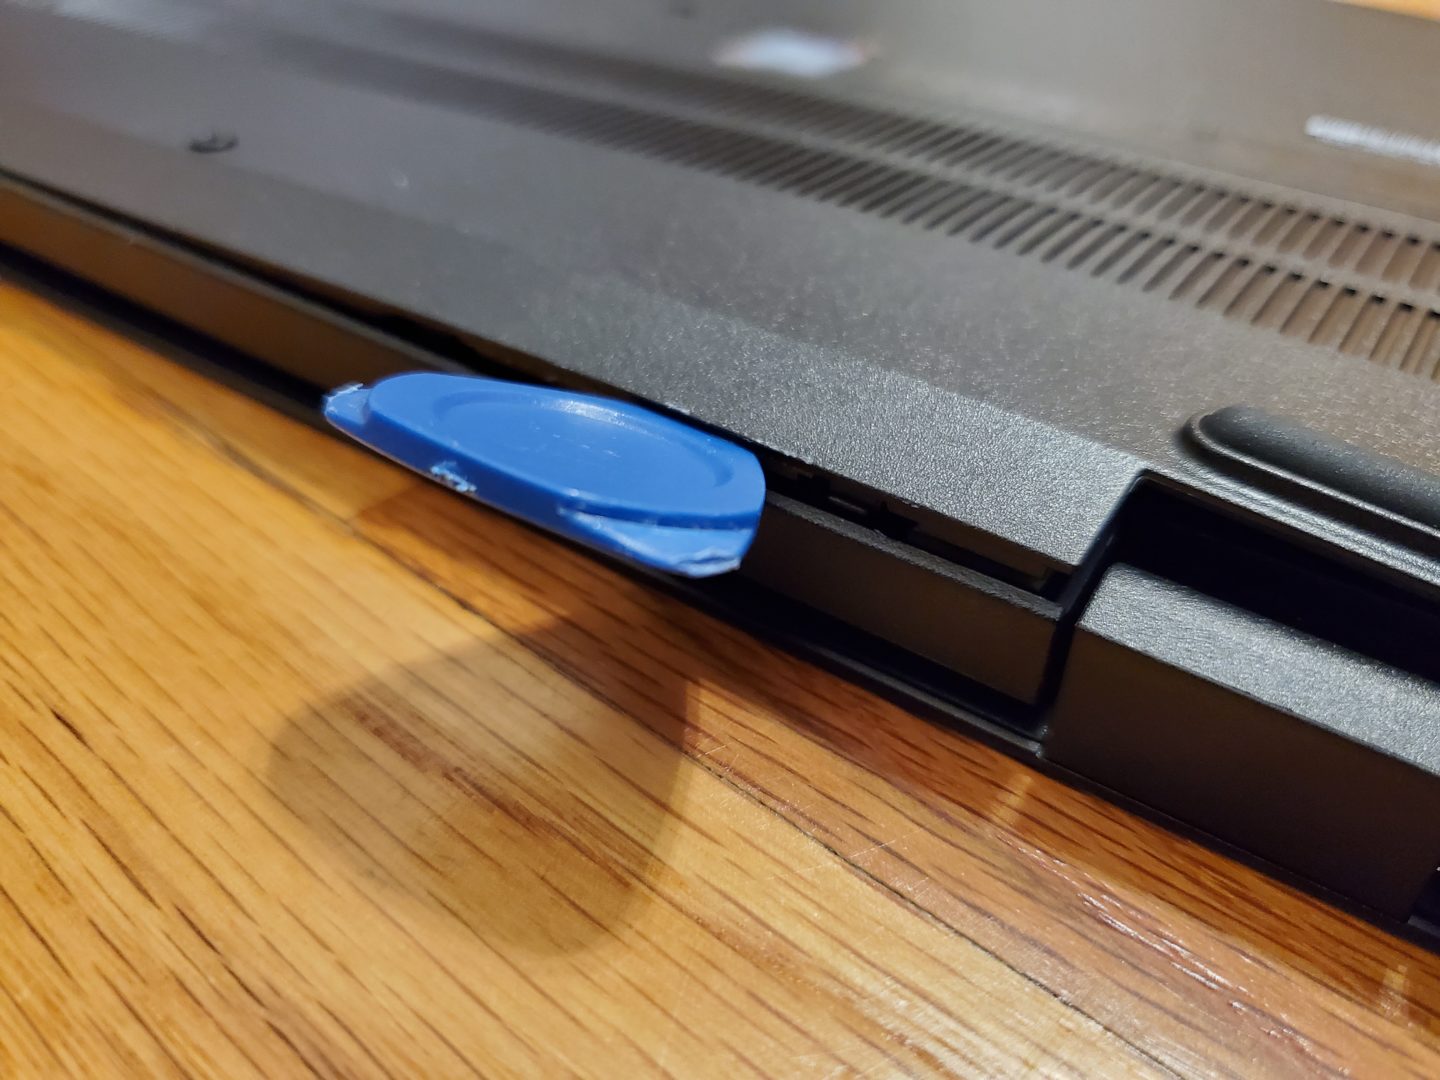
Next, I grabbed a pre tool (or one could use an old credit card, guitar pick, or something similarly rigid and plastic) and started to pry apart the bottom cover. It took me a while to find somewhere I could actually get my pry tool to fit in, which ended up being along the back edge by one of the hinges. Then I just moved the tool along the entire perimeter of the cover until the cover came right off
Remove the battery
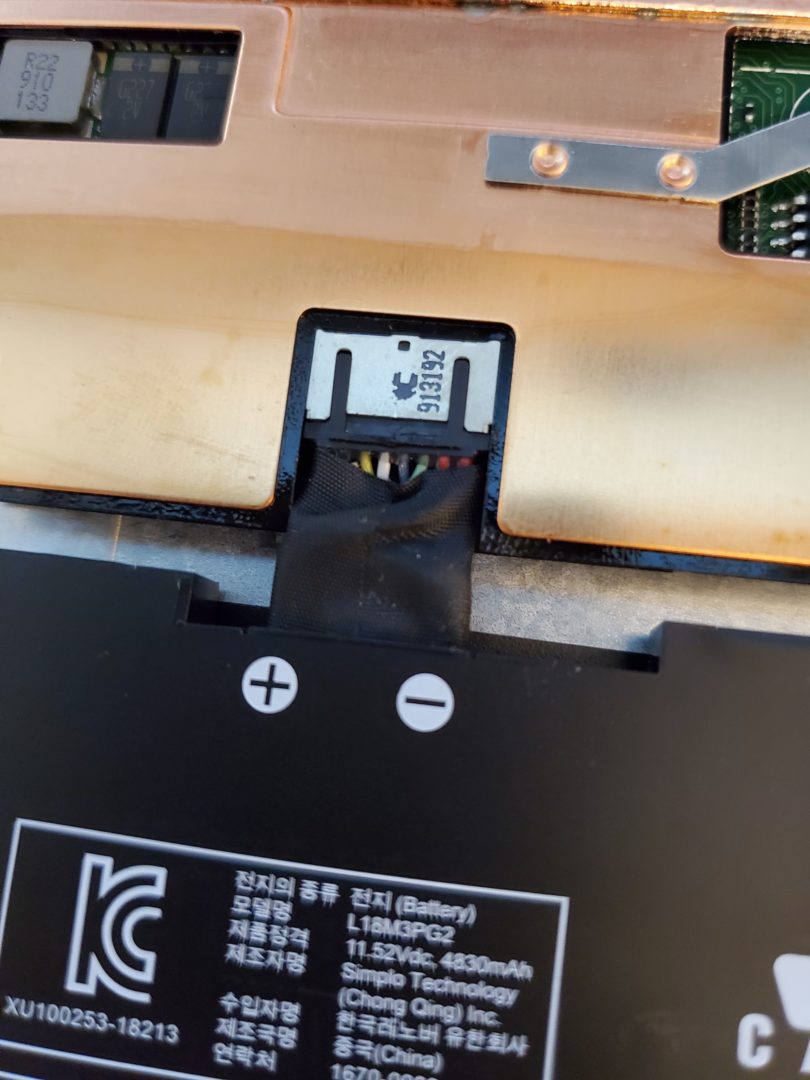
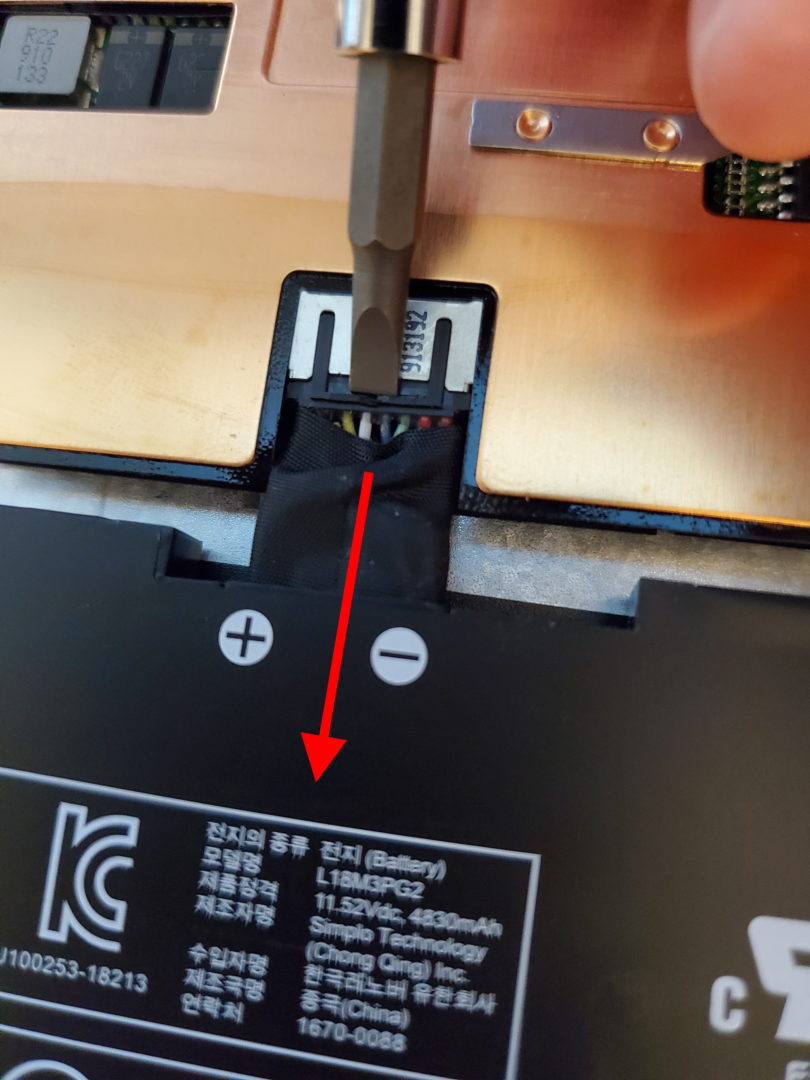
With the bottom cover off, now it’s time to remove the battery. First you need to remove the 4 screws holding the battery in place (these are removable, so don’t lose them!)
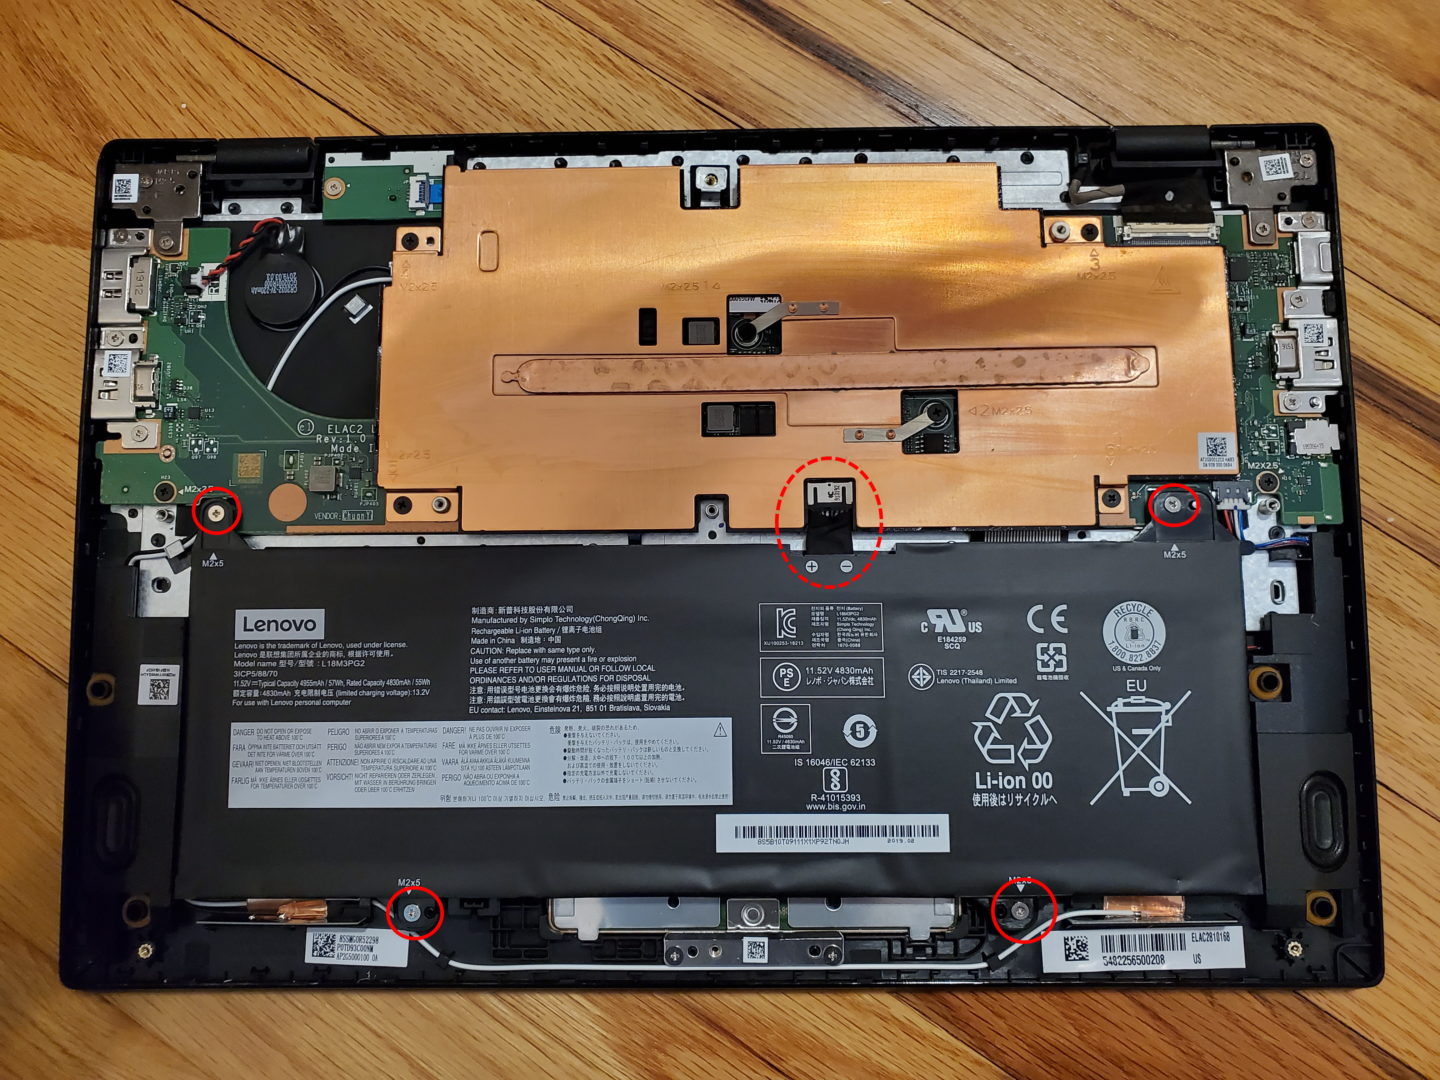
Then, you need to remove the battery cable. The way I did it was by using a flat head screw driver and very gently pushed away from from the connector against the little ridge in the plug as shown below. Just be careful not to jab anything once the cable comes free!
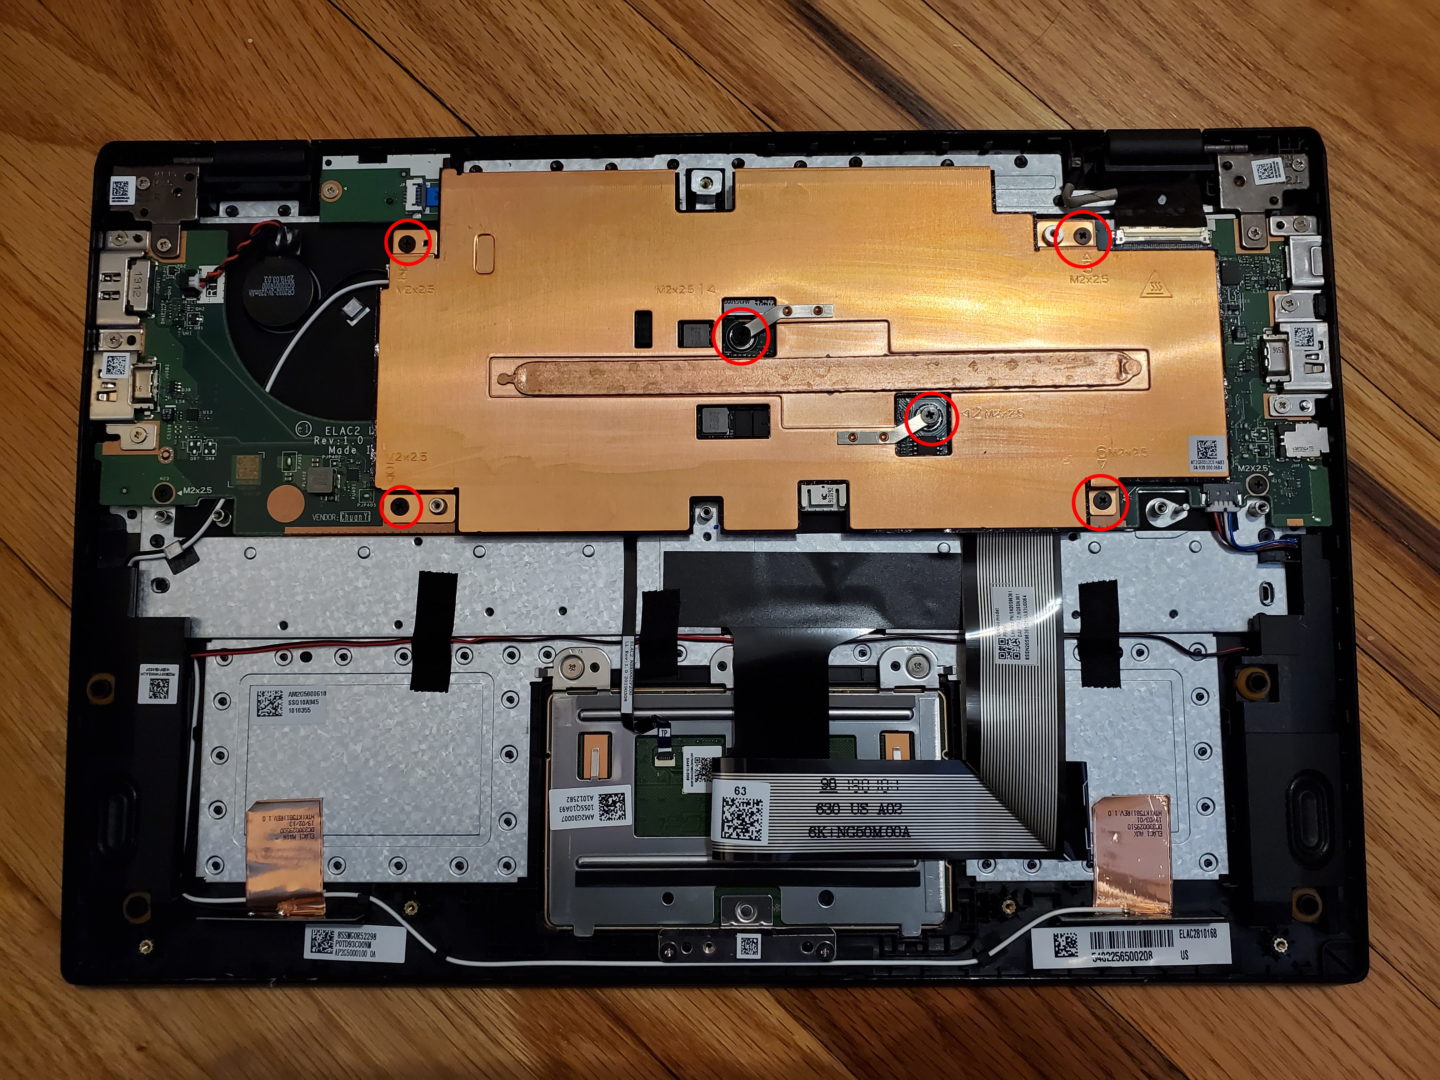
Remove the heatsink
With the battery removed, you’re now ready to remove the heatsink by removing the six screws pictured below. When removing the heatsink, there may be a little resistance because of the thermal paste between the heatsink itself and the CPU, so just be aware.
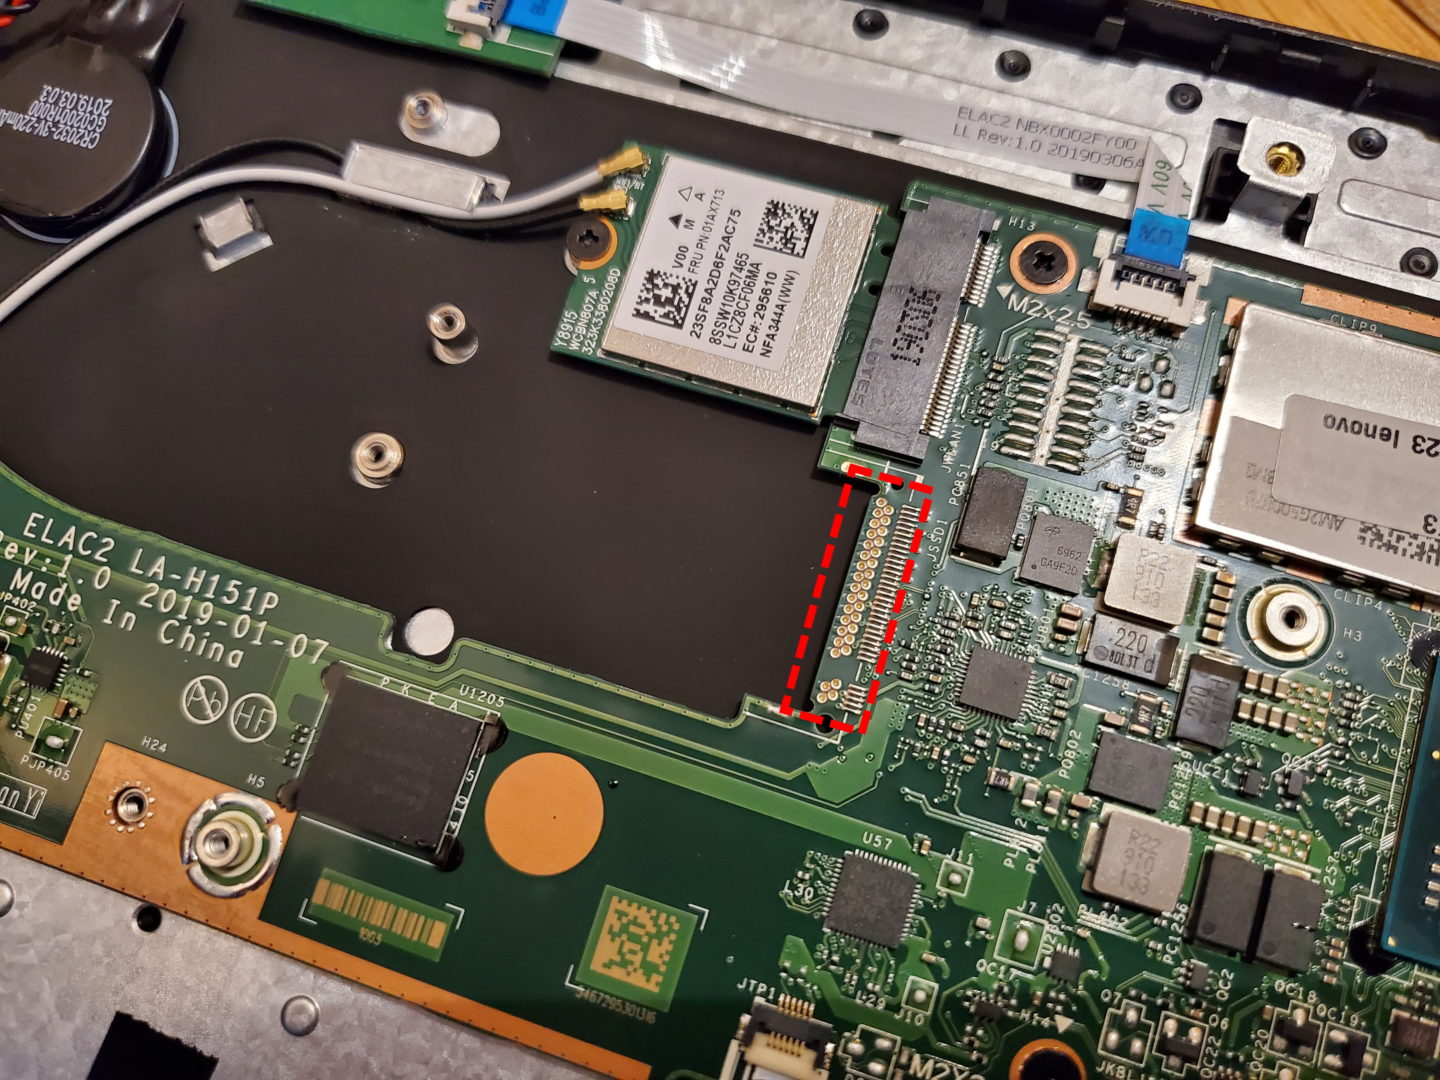
Check for m.2 header
Finally, with the back cover, battery, and heatsink removed, we now have access to see if there is an available m.2 slot:
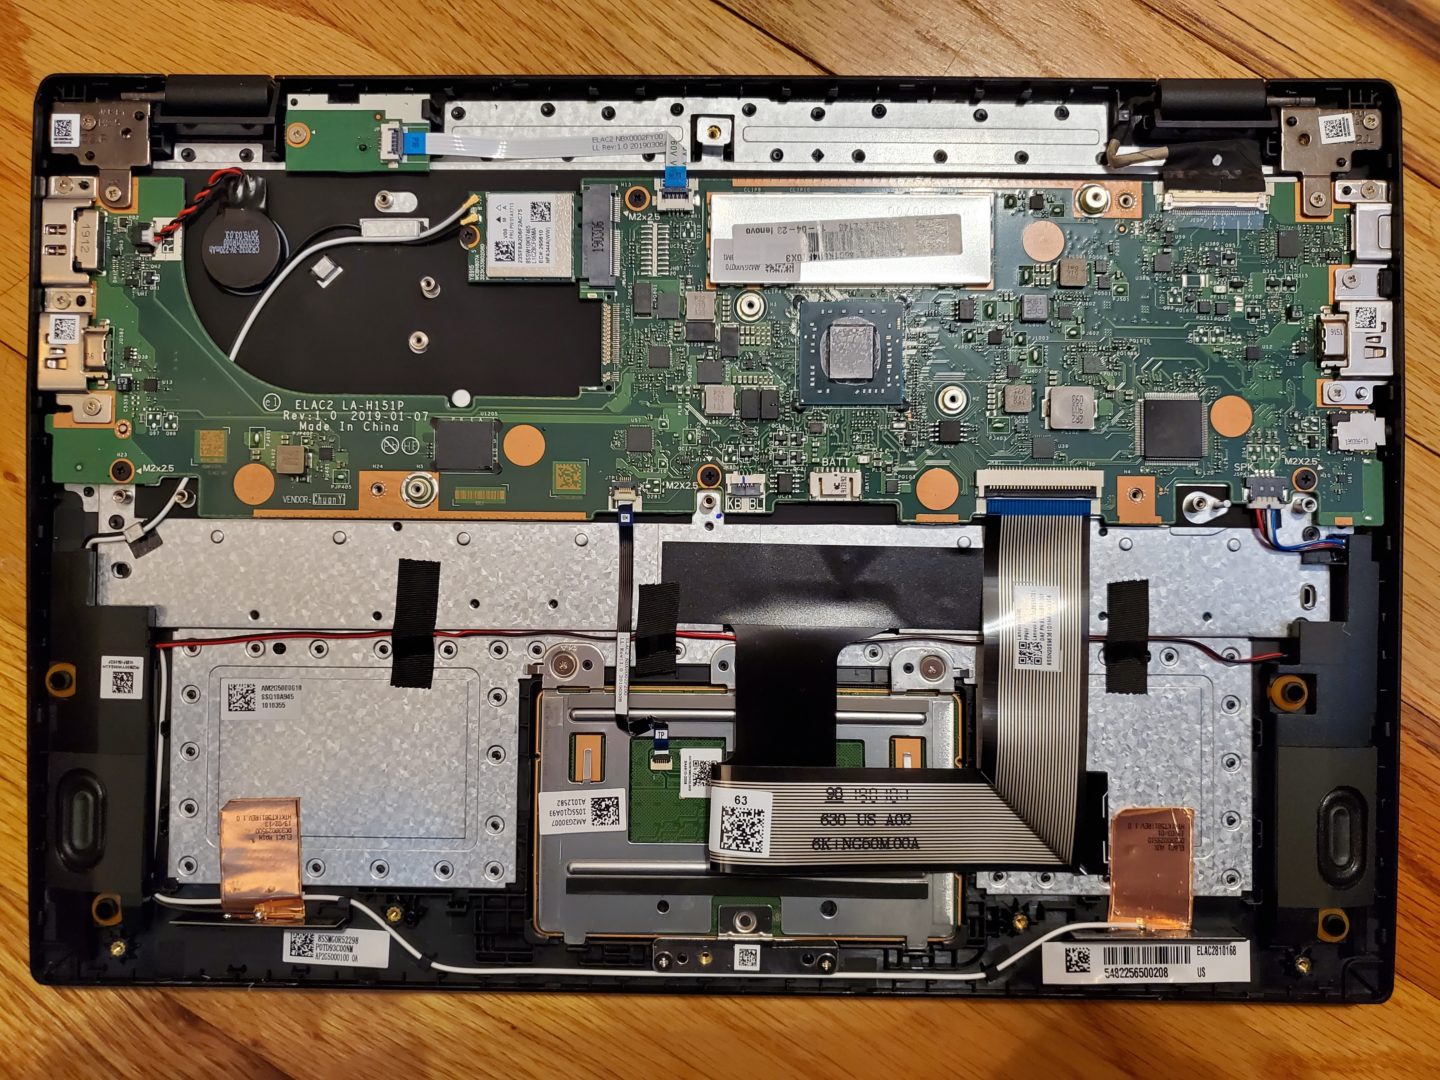
And unfortunately, Lenovo decided to not include the slot in this version of the laptop. If it was there, it would be right next to the wifi card shown below, but if you happened to want to swap out the WiFi card, you could do that at least!:
Wrap Up
To answer the question of whether one can upgrade the SSD on a Lenovo 14w 81MQ laptop (with 64gb eMMC) the answer, apparently, is sadly no; Lenovo decided to leave off the m.2 header that would otherwise allow you to add one. That said, if you wanted to, you can swap out the WiFi card, though not sure there’d be any real need to do so. Note, however, that other 14w versions, meaning, any that do not come with the eMMC storage, should have an existing SSD in an m.2 slot in that location, in which case you could swap it for a different m.2 drive.
Just wonder with the power adapter connected, will the laptop still power on without the battery?
Unfortunately, I no longer have the laptop to test myself – sorry!
yes it will run without the battery. I have one that the battery is DOA and it runs fine on the charger.
Just like the one that I bought (or suckered into).
Now I am off to see if I can find that connector that is on the WiFi card. It ought to be the same as to make stuff cheap a mfgr buys components in large quantities.
The good part is I solder surface mount stuff al the time. Yes, this small but I have done a few 0402 sized components. Te other secret to it is the solder mask (the green layer on the PCB), that often prevents solder paste from forming a trace.
IMPORTANT. This solder paste is not what your father used to attach pipes. It is a mixture of solder particles (lead/tin) and rosin flux. If you are going to attempt this get a paste with a higher flux content, and forget environmental paste, use close to 60/40 lead tin. Easier and one operation isn’t going to destroy the planet.
Well, I just spent some time on this. Here’s what I found
1. The memory chip, called M.2, is pricey. A reasonable size exceeds the retail cost of the machine. Look up M.2 memory on Digikey,com
2. StorFly is pushing M.2 Memory. Virtium looks like part of that business.
3. Digi-key & Mouser don’t mention the mating connector, but that comes up with some ads pushing the “Next Generation Form Factor.” Here 4 form factors are shown with loud music and little else, just pix of the connector edge (not the pin edge) and height above the circuit board….and more loud music.
4. A connector marked 190306 I haven’t found anywhere. But given he cost of M.2 memory I doubt the connector will show up soon.
The hard drive of Lenovo 14W is very small. Can I use external hard disc on this laptop?
sure, any external USB hard drive/ssd should work (portable SSD or 2.5″ HDD ones would be most convenient as they don’t require their own, separate, power supply)
I was given this laptop (Lenovo 14w 81MQ) as payment for repairing another laptop. I have the 64GB eMMC with 4GB of ram. For light work it’s okay. It plays YouTube videos at 720p at speed. It will play videos at 1080p, but there’s often buffering. Most of the software that I use is 32 bit, so I thought about reinstalling Windows 10 32 bit, but I’m not sure if there are drivers for 32 bit; so I’m sticking to 64. There’s a certain city in China, I forgot the name, that specializes in forced upgrades for components that are soldered on. They’ve made Core i5 MacBooks to use a Core i7 and upgraded the soldered on RAM. After I get another laptop, I may desolder the 4GB RAM on this 14w and see if it can take 16GB. I wouldn’t be surprised if will handle 8GB of RAM like the other 14w model has. The desoldering would have to be done personally to make it economical, because having it done [here in the US] would be too costly.